To integrate with DocuSign, Please follow the instruction below:
To Activate DocuSign from ezidox:
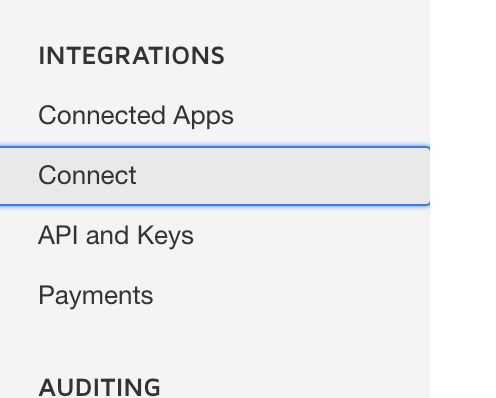
Click on the Username -> Settings -> Integrations -> "Activate" under DocuSign

Then you need to enter your credentials for either your development or production instance (production and development instances will have different credentials) in the popup screen as shown below:

Most likely, you will be using a DocuSign Production Instance; you can confirm this by checking your DocuSign login page.
If it is "https://account.docusign.com" then you are using the Production Instance.
If instead it is "https://account-d.docusign.com" instead, then you are on the Development instance.
Leave the flag "Use Manual Setup for Docusign Connect" to No (see section below for further details).
Once you have completed the configuration on ezidox side, the remaining has to be done on DocuSign.
IMPORTANT: The steps below are NOT required if you have activated your DocuSign Integration in ezidox after 27th May 2019 or if flag "Use Manual Setup for Docusign Connect" is No.
From 27th May 2019, the Connect component will be automatically activated by ezidox - if both this AND the manual Connect setup are active, the system will receive multiple calls which may result in unwanted behaviour.
For DocuSign Integrations activated in ezidox before this date, DocuSign Connect will need to be configured manually; in this case the flag "Use Manual Setup for Docusign Connect" will be set to Yes

If you are unsure, please contact support@ezidox.com for any clarification.
Instructions to follow from DocuSign:
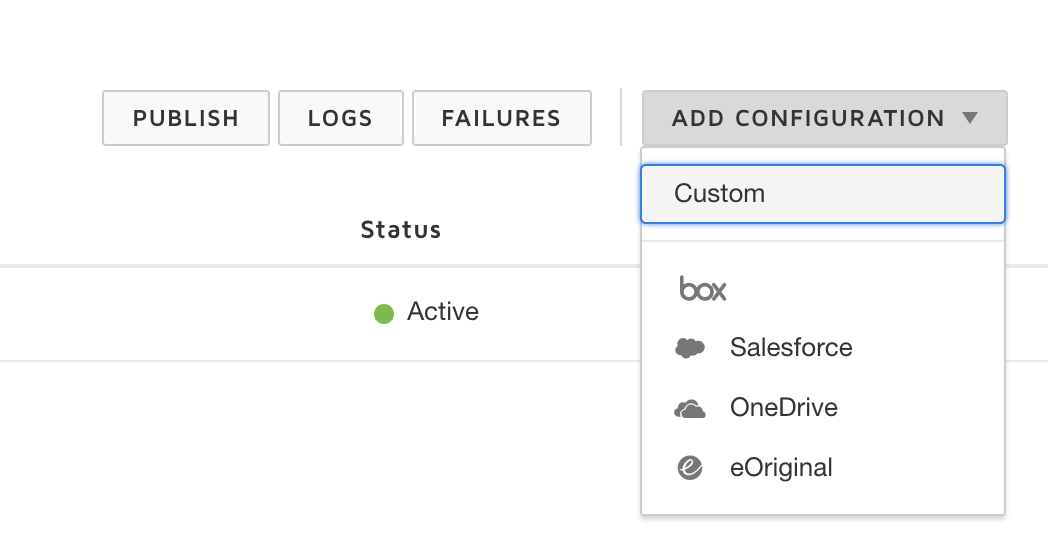
1. In your Admin panel, under Integrations -> Click Connect you can add a new connector.This is required to upload the documents back into ezidox.
2. Select Add Configuration -> Custom
Now, in the settings:
- URL: https://api.ezidox.com/api/ESign/Docusign
- Enable Log: Yes
- Require Acknowledgment: Yes
- Associated Users: Select Users to Include and select the user you have entered in ezidox
- Envelope Events: Envelope Signed -> Completed
- Recipient Events: Recipient Signed -> Completed
Then save and you are now successfully integrated ezidox with DocuSign.
Initial Set up
Step 1:
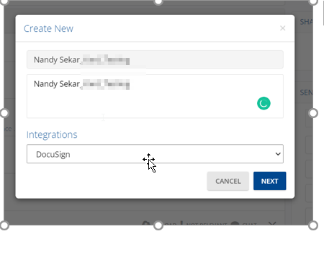
- Go to Settings and go to Attachments Tab.
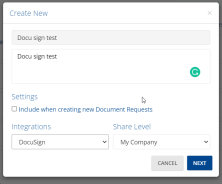
- Click on “Create New”
- Fill in the details and under Integrations drop-down, select “DocuSign”
- Ensure that the “Include when creating new Document Requests” is unchecked.
- Click on Next
Step 2:
- On the next screen, upload the necessary document. The document that is uploaded in this section is the base document. All the documents that are requested for an e-signature should follow the dimensions of this document.
- On the next window, click on “Create New Template”
- Click on “Edit E-Signature Template”
- This will open the Docu-sign page within the ezidox iframe
- Place the signature and initials where necessary
- Click on “Save and Close” after the configuration is done

Requesting an electronic Signature - Collector
Step 3
- Go to the Document Request page
- Under “Send Attachments” tab, click on the + sign
- If the collector wants to request an e-signature for the document that was uploaded in step 2, the collector can simply select the document as mentioned in the below screenshot.

- If the collector wants to request an e-signature on a custom document, for example, the one’s pre-filled with the customer details, proceed to step 4
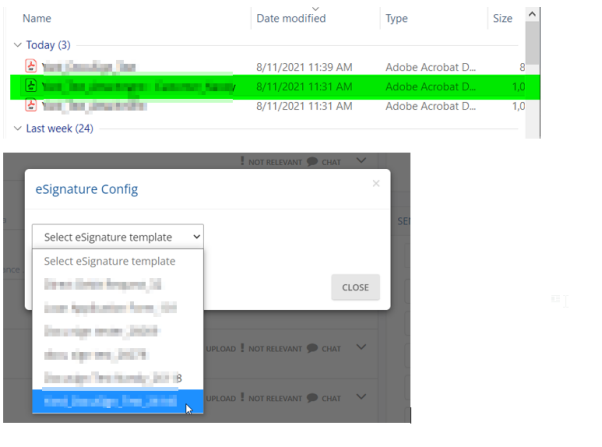
Step 4
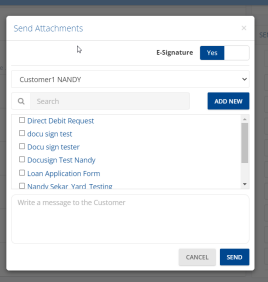
- Toggle the e-signature to “Yes”
- Click on Add New

- In the next screen, fill in the details and under integrations, select “Docusign”
- Upload the relevant document of the customer to be signed
- Under signature Config, select the template which was initially set up in Step 2
- Click on Close
- This would open the Attachment request page
- Toggle the E-Signature to ON
- Select the document that was created now. In this example, it is Nandy_Sekar_Yard_Testing
- Write a message for the customer if required
- This would send an email to the stakeholder/customer
- Note: Step 1 and Step 2 are the one off set up and it need not be repeated every time.
- The collector will perform step 3 during every e-signature request
- The detailed screenshots are attached below for your reference.

Signing the Docu Sign Template – Stakeholder/Customer
- The customer would receive an email requesting to sign a document
- The customer clicks on the request, and it would take them to the ezidox customer/stakeholder portal and the customer will sign the document
- The collector will be notified through email as soon as the customer signs the document


For any other help on integrations, you can always reach us at support@ezidox.com